Help, I have to open a blaster!
Helpful tips and tricks for anyone who has got to open a Blaster for the first time.
Opening a blaster for the first time is a big thing for many people. Most of them are afraid to do something wrong or to damage their blaster. To make sure the first time you open a blaster becomes a success, we put together these tips and tricks to guide you.
What do I need to open a Blaster and get it back together again?
1. Blaster
2. suitable screwdriver
3. pencil
4. sheet of paper or a piece of cardboard
5. tape
Step 1: The screw plan
In order to make a screw plan, we place the respective blaster paper or cardboard and draw an outline. it does not have to be very precise. It’s just important to transfer the rough shape of the blaster. If there is no large enough paper at hand, you can just add several sheets together. This outline will now be serve as a screw plan. Each screw we remove from the blaster is now placed in the respective spot on the screw plan. This allows us to see exactly where each screw belongs to. Most of the blaster screws are the same length nowadays, but manufacturers still use shorter screws to join thinner parts of a shell.
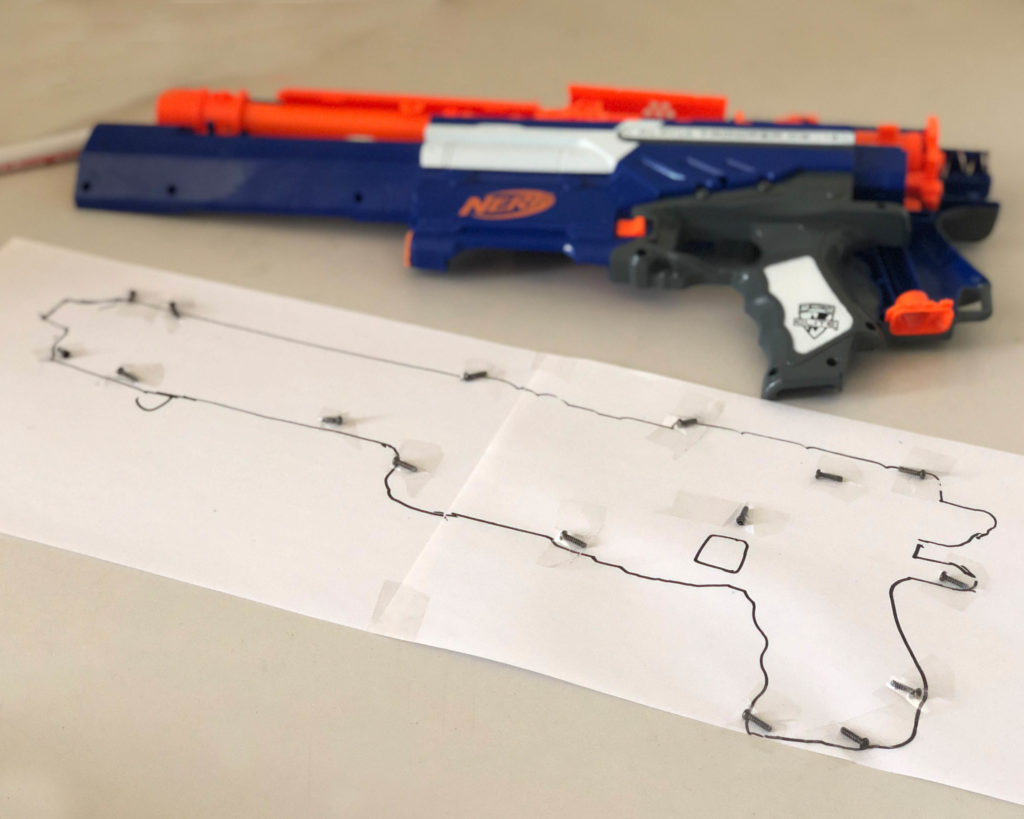
Tip: If you want to leave the blaster for some time, work in a confined space or just want to play it safe, you can also fix the screws. Just tape them onto the plan or, if you’re using cardbord, stick them into the cardbord. This way you won’t lose or mix them up.
Another great way to remember where the screw go, is to just take a picture of the screw plan with the screws on it. Once you’ve done that, you can just keep screws and plan in a box.
Step 2: Open it up
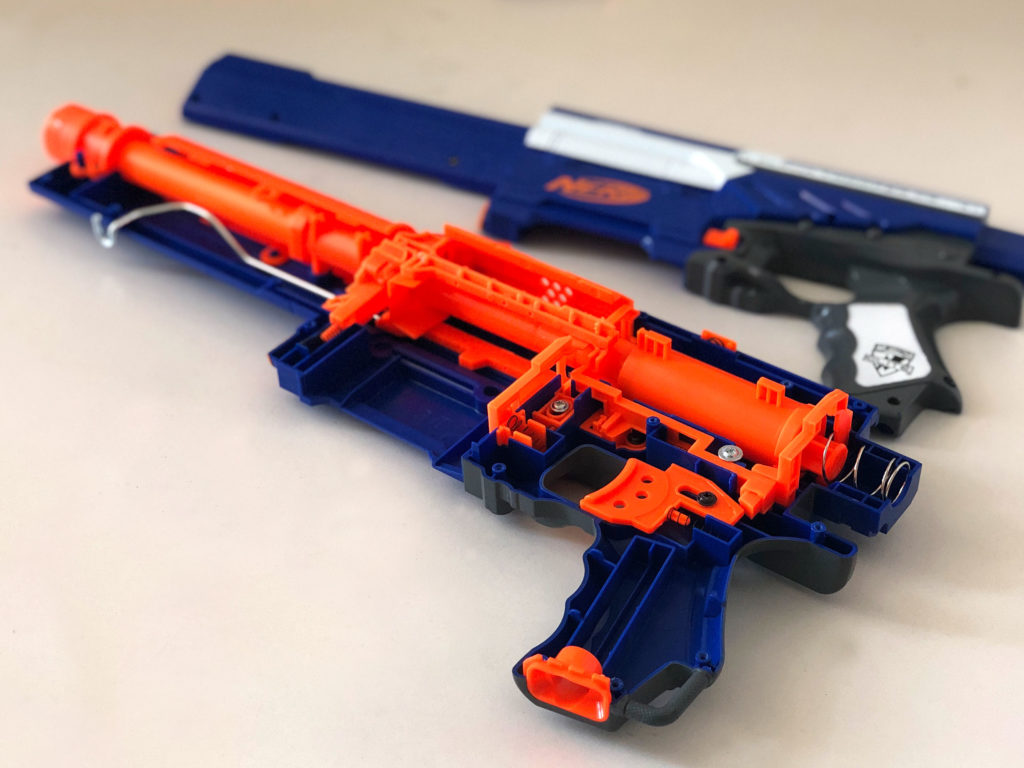
When opening a blaster for the first time, you should be very careful. Some models have very loose parts and small springs that are just waiting to jump out of your blaster, once you’ve opened it.
If you can’t get your blaster open, even though you removed all visible screws, check for hidden screws beneath movable parts. Manufacturer BuzzBee sometimes hides screws beneath clip-on plastic covers as well.
Tip: If all screws are removed and you still can’t get it open, do a quick online search. Your results will tell you if you need to apply some gentle violence stuck or if there’s a trick to it.
Step 3: Documentation
As soon as you opened you blaster hold on! From now on every step and every part should be documented. I personally always take a photo of the open Blaster with all the tiny parts in all the right places before moving on and another one after each part I remove. The smaller the parts you’re taking out, the picture should be taken to be able to put them back together later on. These picutres will help to reassemble the blaster later on.
It’s worth collecting all removed parts in one container and to store them together. That way you can make sure everything stays together and clean. Lubricated parts of spring-loaded blasters can be kept in freezer bags to avoid lubricating everything within the blaster, on your working table and yourself. This also helps keeping the parts clean.
Step 4: Modding
Whatever your reason was to open the blaster in the first place, now it’s open and it’s time to go!
Step 5: Reassembly
Reassembling your blaster should not pose too much of a problem, as you documented everything very carefully. Just put everything back as it was before opening the blaster – except for the parts you wanted to remove of course. Use your screw plan to put all screws back in the correct spots.
If the position of a part is not clear because you forgot to take pictures or the part just fell out when you opened the blaster, here are some tips:
1. online search with the blasters name and „Internals“ will give you pictures of almost every blaster’s internals. Great to put things back together, even if something went sideways.
2. YouTube offers a ton of „How to disassemble“ videos showing the exact positions of every single parts.
3. If you’re done and have a tiny small orange part left, which doesn’t seem to belong anywhere specific, it’s probably just the part of the tactical rail locking accessories in place. Depending on the blaster it’s, a solid part or a thin piece of plastic and a short, wide spring.

If you’re still stuck, visit Blasted.de, our Germany Community Board. We’re always happy to help.
Good luck!
Author: SirScorp

Get the perfect screwdriver for NERF modding now on Blasterparts.com


